|
Getting Started
In 2FA releases prior to v2.5, authorized users had to be setup individually in each VM subscription and the CNS Client Area was unprotected by 2FA. This opened a potential security hole because an unauthorized hacker could theoretically login to the CNS Client Area and disable 2FA before subsequently logging into the (formerly) 2FA protected VM. This is a real threat if the same CNS subscriber account password was also used on other sites by the CNS subscriber. CNS 2FA v2.5 extends protection to the CNS Client Area, where authorized users in the 2FA protected OS/VM are actually registered as account contacts. After registering all authorized users, they only need to be mapped to Windows User accounts in the VM/2FA subscription details (in the CNS Client Area). If no users are mapped in the subscription details then all Windows Users will default to the registered CNS account owner for two-factor authentication. If you do not want the authorized VM users to have access to your CNS Client Area, simply register them but do not grant any permissions. This will enable those users to login to the CNS Client Area to register/manage their mobile device, and nothing else.
If you intend to use the software token then you should first install Google Authenticator in your mobile device. This can be easily installed from the app store for your device. (Play Store, App Store, Etc.) We also recommend that the barcode scanner is installed (it may be an optional/recommended install). Installing the barcode scanner will enable you to register the mobile device by simply pointing the camera at a QR code on the screen to read the configuration. Google Authenticator is available for many platforms, including Android & iOS.
* Some subscribers may not be able to install Google Authenticator. Apps like Authy (available for Android & iOS) can be used to receive your codes for CNS 2FA and other popular services as well. OTP Authenticator is based off of the Google Authenticator source and behaves almost identically: https://kuix.de/android/otp-authenticator/ (you may need to enable installing apps not from the play store to perform the install)
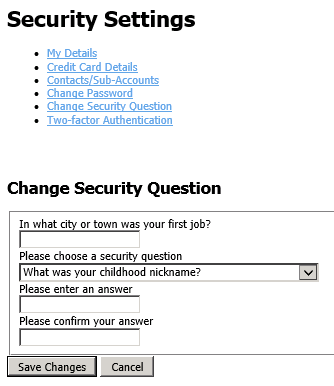
| The first step is to login to your CNS Client Area and click "My Details" at the top of the screen. |
 |
| Then click "Change Security Question" and complete the form. This is important in case you lose your mobile device and require CNS Support assistance to regain access - it may help you get logged back in faster. |
 |
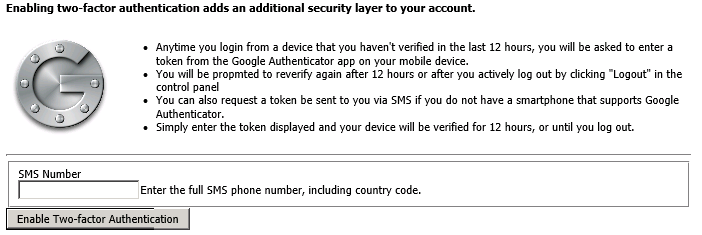
| Next, click "Two-factor Authentication".
You will be directed to a page prompting for your SMS phone number. In this box, enter the country code + mobile number. For example, the country code for the US is +1. If the phone number of this device is (619) 555-1214 then the number to be entered will be 16195551214, etc..
After entering your mobile device phone number, click the button to Enable Two-Factor Authentication.
|
 |
Within a few seconds, you should receive a confirmation SMS notifying you that 2FA has been setup on your account - DO NOT LEAVE THE PAGE YET
|
The next page will look similar to the graphic at the right.
Open Google Authenticator on your mobile device and click the menu item to setup an account. You will be offered two ways to do that, either scanning the barcode or entering a provided key. By far, the easiest way to register the device is to scan the barcode. If a manual key needs to be entered, it is displayed below the QR code, as shown in the graphic to the right.
If you did not receive the SMS confirmation then try clicking the button to disable 2FA and start the process over again with a corrected phone number. SMS delivery should be operational worldwide, however depending on your mobile provider the time required to receive the message could be several minutes.
If you are unable to receive the SMS and experience trouble registering your mobile device in Google Authenticator, click "Disable Two-factor Authentication" before leaving the page.
Please open a support ticket if you require additional assistance.
|
 |
Configuring Additional CNS Client Area Users
To add CNS Client Area account contacts, click "My Details" in the yellow navigation area. Then click, "Contacts/Sub-Accounts". Select the "Add New Contact" drop-down item and be sure to check "Tick to configure as a sub-account with client area access".
Grant the necessary permissions, if desired, and save. The new account contact should then login to the CNS Client Area under their newly created account and register a mobile device, as detailed in the section "Getting Started" (above).
Please see the section "Mapping CNS Account Contacts to Windows Users" (below) for information about linking Windows logins with registered 2FA users.
Installing the CNS 2FA Client Software in Windows
NOTE: If you are upgrading a CNS VPS already protected with the previous 2FA v2.0 software (SMS only), you must first complete the section "Upgrading from the CNS 2FA 2.0 Client" before instalilng the software.
The CNS 2FA Client Software is required to be installed in the 2FA protected machine. If you ordered a new CNS VPS on/after November 13, 2013 and selected to install 2FA at that time then the software is already installed for you. Otherwise, simply download the client software (available at the bottom of this KB article) and install it into the Windows OS that is intended to be protected by 2FA. Note: All CNS software downloads are always digitally signed for your protection. It is good practice - for any software you may download - to save it and then right-click on the file and select "properties". You should see a digital signature tab with the certificate details. If you do not see a digital signature tab, or if the digital signature reflects as invalid, then consider the software to be suspect, as it may be infected with malicious software.
If the OS being protected by 2FA is a CNS VPS then skip to the section titled "Mapping CNS Account Contacts to Windows Users". If the OS being protected is not hosted by CNS, you must next enter a license key into the client software.
Entering the License Key
This step is not required if the VPS being protected by 2FA is hosted by CNS because CNS Two-Factor Authentication is included free with every CNS VPS subscription. A license key is only required for CNS 2FA software subscriptions in order to secure servers not hosted by CNS. A separate license is required for each Windows OS to be protected by 2FA. There is no limit to the number of authorized users.
The license key can be obtained from the CNS Client Area by clicking "My Products & Services" then the "View Details" button next to the CNS 2FA software subscription. The license key begins with "CNS-2FA".
In the Windows OS being protected by 2FA, click Start-> Programs-> CNS Two-factor Authentication-> Licensing, and enter the license key.
NOTE: If you later decide to uninstall 2FA from this computer and move it to another computer, you should return to the CNS Client Area and click "Reissue License". The license key will remain the same. This simply "unglues" the license from the existing machine so the next machine that authenticates the license can claim it.
Mapping CNS Account Contacts to Windows Users
"Mapping" is a term used to link Windows users in a 2FA protected Windows OS to a registered user in the CNS Client Area. If the registered CNS Account owner is the only authorized user in a 2FA protected VM then this section can be safely ignored. By default, all Windows users are mapped to the CNS Subscriber Account owner's 2FA token.
|
In order to map additional users, it is first necessary to register them as additional account contacts in the CNS Client Area, so they can register and manage their mobile device. In cases where account contacts should not have access to a 2FA secured server, all that is required is to do nothing - do not map those contacts to Windows users.
In order to map users, you must first register your users as CNS Client Area contacts (see "Configuring Additional CNS Client Area Users", above).
To access the mapping table, click "My Products & Services"-> "View Details" next to the VM or 2FA subscription. You may need to scroll down to find the mapping table, which will look something like the table on the right.
Select the registered CNS Client Area contact in the drop-down box and then enter the associated Windows user name, such as Administrator. The Windows user name is the user name the user logs into the 2FA protected OS as. Then click "ADD MAPPING". Changes are registered instantly.
|
 |
Upgrading from the CNS 2FA 2.0 Client
If you are upgrading a VM hosted by CNS with the older CNS 2FA v2.0 client (SMS only) then it is necessary to first uninstall the software from the VM before proceeding to install the new CNS 2FA v2.5 client.
2008/2012: In the VPS, select Start-> Control Panel-> Programs and Features
Select "CNS Two-factor Authentication Client" and then click on "Uninstall". Confirm to remove pGina 2 and all plugins, and then click "Uninstall". DO NOT REBOOT (YET)
Proceed to install the CNS 2FA v2.5 Client Software. A reboot is required after installing the new CNS 2FA v2.5 client software.
2003: In the VPS, select Start-> Control Panel-> Add/Remove Programs
Select "CNS Two-factor Authentication Client" and then click on "Uninstall". Confirm to remove pGina 2 and all plugins, and then click "Uninstall". DO NOT REBOOT (YET)
Proceed to install the CNS 2FA v2.5 Client Software. A reboot is required after installing the new CNS 2FA v2.5 client software.
Logging into a 2FA Protected VM
Logging into a 2FA protected VM requires a changing code is entered after the password and while the 2FA remote desktop screen is displayed. When a RDP session is first established, the user may receive a normal RDP popup on their remote PC which is prompting for the Windows user name and password. This first step only requires the regular Windows user name and password, without the 2FA code.
After successfully completing this step, a Windows login will be displayed *in a remote desktop window*. Here, all that is required is to login with the Windows user name (typically Administrator) and the password, immediately followed by the changing code displayed on the software token.
For example, if the Windows user logging in is "Administrator", the password is "password", and the changing code on the software token is "123456" then the following should be entered:
User: Administrator
Password: password123456
If you do not have the software token installed, or require a one-time SMS code, enter only "sms" in the password field. A one-time SMS code will be sent to you which is valid for five minutes only. Complete the process again and use the code received by SMS as your token code.
Logging into the a 2FA protected CNS Client Area
To login to the CNS Client Area with 2FA activated, simply login with your regular user name (email address) and password. A second screen will appear for the 2FA code displayed on your mobile device. There is also a link on that second page to send a one-time SMS code, which will only be valid for 5 minutes after it is requested.
Uninstalling 2FA
Uninstalling the software client from the OS will remove 2FA protection from the windows OS. It will not remove 2FA protection from the CNS Client Area. To do that, you should return to the CNS Client Area and click "My Details" and then "Two-Factor Authentication". Then, click the button to disable 2FA.
To uninstall the 2FA software from the Windows OS, go into Add/Remove Programs and uninstall the software titled "CNS Two-factor Authentication". A reboot should not be required.
To deactivate 2FA from your CNS account, return to the "My Details" page in the CNS Client Area and click the two-factor authentication link. You will find a button to deactivate it.
|

